To all of my dear followers, this blog has moved to my new homepage.
Have a look at www.stoneforce.se to see the progress of my work!
måndag 19 mars 2012
måndag 27 februari 2012
Behind the scenes, characters number 1 and 7; photo shoot at Medljus
We had booked saturday for character number 1 and sunday for character number 7.
I had prepared everything very neatly, bought all of the make up, arranged the costumes and prepared every step carefully the day before, so once the model arrived, it was just to get started. I had my assistant who also happens to be my sister, Elin Stenfors, there all weekend since I really need an extra hand with the makeup and putting on the costumes.


söndag 26 februari 2012
Step 4, The foetus; making the silicone mould with fiberglass jacket.
Since there is a large undercut in the sculpt, the mould needs to be in silicone, which is flexible, a fiberglass mould would make the core get stuck in the mould and ruin the foetus.

The first layer of moulding silicone is brushed on as a thin layer, covering the whole sculpt and clay wall, this will pick upp all of the detail, and it also helps to avoid air traps. It looks like melted strawberry ice cream, but you should definitely not eat it.

Once the first layer is tacky, but not completely set it is time for the next layer of silicone. To test this you can put your finger on the surface after about 15 min, it should leave a fingerprint on the silicone without still being wet, if it starts to let go of the sculpt, it is to dry and the second layer will be hard to apply.
The second layer has thixotropic mixed into it, which makes it thicken up to a more buttery consistency. Use a paintbrush or a wooden mixing stick to apply the silicone evenly across the first layer.
Leave it to set for at least an hour, it is important for the silicone to be completely set before fiberglassing. Also remember that different silicones has different abilities, and you need to test it first to know how fast it sets etc. Once it is set you can remove the clay wall surrounding it, trimming it down to the same level as the silicone. On top of the silicone I need to make a fiberglass jacket, that will hold the silicone in place.
Cut away a few wedges around the edge for the fiberglass to snap on to.

Then it is time for fiberglassing, remember to wear protective clothing since the fumes can severely harm your breathing organs longterm. You need to wear a respirator that protects you from organic vapors, glasses, an overall or other protective clothing. You will also need a pack of latex gloves, since you are going to need to change a few times during the process.

The first layer is the Gel coat, it picks upp all lof the details and creates the base for the mould. Is is a thick, slightly pink transparent gel that you mix with 2-6 percent catalyst. 2 percent is recommended, if you over catalise it it will crack, but if the room is very cold it can be a good idea to add some extra catalyst into it, since you will have to wait forever to make the second layer else way.
Cover the whole surface with a layer of about 1 cm gel coat with a paint brush, leave it to set and clean out the brush with aceton immediately.

After about 20 minutes, the gel coat should be tacky, feel it with a gloved finger. Once it is tacky you sprinkle loose fiberglass on top of it, this wil the make the gel coat stick to the fiberglass matt.

Wait about another 10-15 minutes, until the gel coat is set. Then you start to apply the fiberglass matts with resin. The resin is mixed with one percent catalyst by weight, and it is very important not to over catalyse since it might get to hot and start to burn. Paint the fiberglass matt onto the gel coat with resin and a pint brush, the resin dissolves the fiberglass matts and they will create one smooth surface. Finish the procedure with adding a thin fiber glass cloth on top, that will make it smooth and less itchy.

Leave the fiberglass to set for about 20 minutes, once it starts to get a bit green to its color, you can trim the edge with a scalpel like cutting cardboard, but don't wait to long since once it is set you will need to trim it with a power saw.
Leave it to set properly for about an hour.

Then you can turn the mould over and remove the clay wall, be careful not to harm the sculpt. You will probably need to do some minor repairs to the back of the sculpt since it will probably be a little bit damaged no matter how careful you are.

Put up a new clay wall around the edge of the silicone, and sculpt in wedges matching the ones you made on the other half.

Then you repeat the whole process on the other half, and wait for the second half to set properly, the whole process took me two days, with a lot of waiting in between, so it is a good idea to be working on something else parallel.
The first layer of moulding silicone is brushed on as a thin layer, covering the whole sculpt and clay wall, this will pick upp all of the detail, and it also helps to avoid air traps. It looks like melted strawberry ice cream, but you should definitely not eat it.
Once the first layer is tacky, but not completely set it is time for the next layer of silicone. To test this you can put your finger on the surface after about 15 min, it should leave a fingerprint on the silicone without still being wet, if it starts to let go of the sculpt, it is to dry and the second layer will be hard to apply.
The second layer has thixotropic mixed into it, which makes it thicken up to a more buttery consistency. Use a paintbrush or a wooden mixing stick to apply the silicone evenly across the first layer.
Leave it to set for at least an hour, it is important for the silicone to be completely set before fiberglassing. Also remember that different silicones has different abilities, and you need to test it first to know how fast it sets etc. Once it is set you can remove the clay wall surrounding it, trimming it down to the same level as the silicone. On top of the silicone I need to make a fiberglass jacket, that will hold the silicone in place.
Cut away a few wedges around the edge for the fiberglass to snap on to.
Then it is time for fiberglassing, remember to wear protective clothing since the fumes can severely harm your breathing organs longterm. You need to wear a respirator that protects you from organic vapors, glasses, an overall or other protective clothing. You will also need a pack of latex gloves, since you are going to need to change a few times during the process.
The first layer is the Gel coat, it picks upp all lof the details and creates the base for the mould. Is is a thick, slightly pink transparent gel that you mix with 2-6 percent catalyst. 2 percent is recommended, if you over catalise it it will crack, but if the room is very cold it can be a good idea to add some extra catalyst into it, since you will have to wait forever to make the second layer else way.
Cover the whole surface with a layer of about 1 cm gel coat with a paint brush, leave it to set and clean out the brush with aceton immediately.
After about 20 minutes, the gel coat should be tacky, feel it with a gloved finger. Once it is tacky you sprinkle loose fiberglass on top of it, this wil the make the gel coat stick to the fiberglass matt.
Wait about another 10-15 minutes, until the gel coat is set. Then you start to apply the fiberglass matts with resin. The resin is mixed with one percent catalyst by weight, and it is very important not to over catalyse since it might get to hot and start to burn. Paint the fiberglass matt onto the gel coat with resin and a pint brush, the resin dissolves the fiberglass matts and they will create one smooth surface. Finish the procedure with adding a thin fiber glass cloth on top, that will make it smooth and less itchy.
Leave the fiberglass to set for about 20 minutes, once it starts to get a bit green to its color, you can trim the edge with a scalpel like cutting cardboard, but don't wait to long since once it is set you will need to trim it with a power saw.
Leave it to set properly for about an hour.
Then you can turn the mould over and remove the clay wall, be careful not to harm the sculpt. You will probably need to do some minor repairs to the back of the sculpt since it will probably be a little bit damaged no matter how careful you are.
Put up a new clay wall around the edge of the silicone, and sculpt in wedges matching the ones you made on the other half.
Then you repeat the whole process on the other half, and wait for the second half to set properly, the whole process took me two days, with a lot of waiting in between, so it is a good idea to be working on something else parallel.
fredag 24 februari 2012
Step 2, character number 2; making the plaster mould.
When the sculpt is ready to be moulded, first thing to do is to put up a clay wall.

It is important to remember that the head cast is firm, so don't put the wall to far back, since it will create an undercut and the mould will stick to the cast. You don't want this to happen!
The wall is put up about 2 cm from the edge of the sculpted mask, this will work as touch down when putting it back together, along with the eyes.

To strengthen the wall, I cover the back of the head with cling film and then putting plaster bandage over it. This makes the clay wall strong enough to hold the plaster when moulding.
Make the wall smooth and put some Vaseline on all of the exposed plaster, to prevent them from sticking to each other.

Then lay the cast down and cover all exposed areas with plastic to avoid it getting to messy.

Mix the first layer of plaster really thin, like a single cream, carefully covering the whole sculpt, this will pick up all of the detail.
Then continue with several thicker layers until it is thick enough, about 5-7 cm all over.

Since the mould will be placed in the bottom, with the cast pressed down into it when making the latex foam, the top of it needs to be flat. To make it flat I file it down with a surform when the plaster is starting to set, but still is quite soft.

Then the mould is done and I leave it to set over night.
It is important to remember that the head cast is firm, so don't put the wall to far back, since it will create an undercut and the mould will stick to the cast. You don't want this to happen!
The wall is put up about 2 cm from the edge of the sculpted mask, this will work as touch down when putting it back together, along with the eyes.
To strengthen the wall, I cover the back of the head with cling film and then putting plaster bandage over it. This makes the clay wall strong enough to hold the plaster when moulding.
Make the wall smooth and put some Vaseline on all of the exposed plaster, to prevent them from sticking to each other.
Then lay the cast down and cover all exposed areas with plastic to avoid it getting to messy.
Mix the first layer of plaster really thin, like a single cream, carefully covering the whole sculpt, this will pick up all of the detail.
Then continue with several thicker layers until it is thick enough, about 5-7 cm all over.
Since the mould will be placed in the bottom, with the cast pressed down into it when making the latex foam, the top of it needs to be flat. To make it flat I file it down with a surform when the plaster is starting to set, but still is quite soft.
Then the mould is done and I leave it to set over night.
torsdag 23 februari 2012
Step 3, the foetus; clay walling tiny sculpts.
Since the sculpt is very tiny, everything suddenly gets more complicated. To put up a clay wall with a neat seam is not the easiest thing. Allow extra time for this step, since you don't want to mess it up.

Starting with placing the foetus on some mattress foam or polystyrene to have a base for the foetus to lie on.

Then make the clay wall as if the the sculpt is pressed down into it, but don't press it down, build it up until it covers half of the sculpt, with fine lines around the joint. To achieve this I used different dental tools, fine paintbrushes, make up sponges and water. Water is good since the foetus is sculpted in chavant so the water won't have any effect on it except cleaning the pottery clay away.

When the joint is neat you need some keys for the second half of the mould to hold on to, just make them with something round.

Then I put up another wall around the one I've just made, to create the side of the silicone mould.
Once all of this is done the foetus is ready to be moulded.
Starting with placing the foetus on some mattress foam or polystyrene to have a base for the foetus to lie on.
Then make the clay wall as if the the sculpt is pressed down into it, but don't press it down, build it up until it covers half of the sculpt, with fine lines around the joint. To achieve this I used different dental tools, fine paintbrushes, make up sponges and water. Water is good since the foetus is sculpted in chavant so the water won't have any effect on it except cleaning the pottery clay away.
When the joint is neat you need some keys for the second half of the mould to hold on to, just make them with something round.
Then I put up another wall around the one I've just made, to create the side of the silicone mould.
Once all of this is done the foetus is ready to be moulded.
Step 1, character number 2; sculpting the mask.
Character number two is between the bird man of character number 1, and a human, which is the next step.
His face is suppose to look as if it transforming from a beak into a human face. I will make the face as a foam latex mask, on top of a Lycra hood.

To sculpt this I use grey pottery clay, my favourite. I start with getting the right proportions based on my designs.

When the proportions are accurate I start to work on the surface, since this is to be as skin like as possible the surface needs to be smooth. To achieve this I use different types of sculpting kidneys. My favourite is the serrated one in combination with the rubber one, if you alter the two the surface will eventually be smooth.

When the surface is smooth and all of the details are in place, I work on the skin texture, using different sponges to simulate pores and skin. An orange can also be handy for this.
Once the texture is done it is time to make a one piece plaster mould of it

His face is suppose to look as if it transforming from a beak into a human face. I will make the face as a foam latex mask, on top of a Lycra hood.
To sculpt this I use grey pottery clay, my favourite. I start with getting the right proportions based on my designs.
When the proportions are accurate I start to work on the surface, since this is to be as skin like as possible the surface needs to be smooth. To achieve this I use different types of sculpting kidneys. My favourite is the serrated one in combination with the rubber one, if you alter the two the surface will eventually be smooth.
When the surface is smooth and all of the details are in place, I work on the skin texture, using different sponges to simulate pores and skin. An orange can also be handy for this.
Once the texture is done it is time to make a one piece plaster mould of it
onsdag 22 februari 2012
Step 2, the foetus; sculpting the skin.
When the Fimo skeleton is done you can start sculpting the skin.
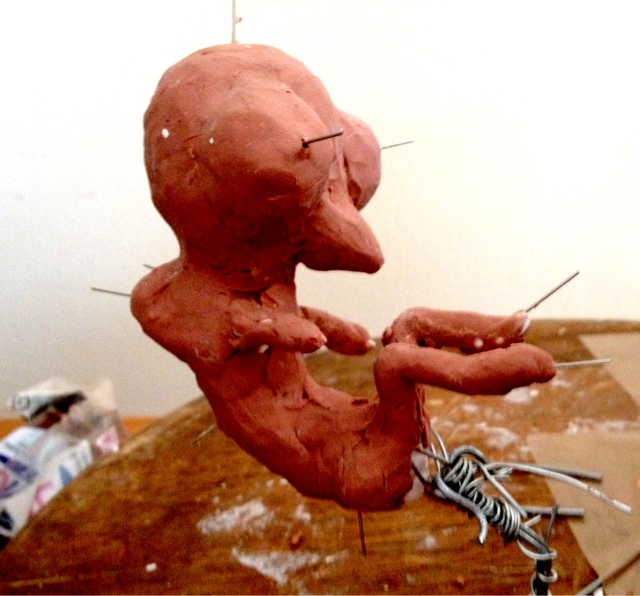
To do this I use chavant clay, and sculpt a thin layer on top of the Fimo. I have made an armature to hold the foetus while I sculpt, so I can reach it from all directions. The armature is bendable which allows me to move it around as I want.
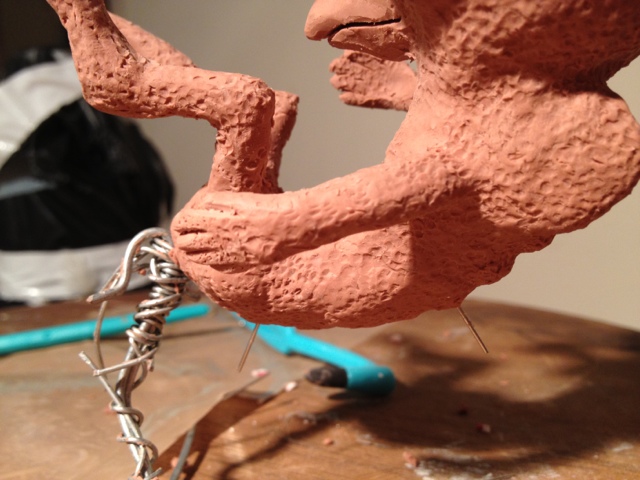
It is tricky to sculpt this small and takes considerably longer time than what you can imagine.
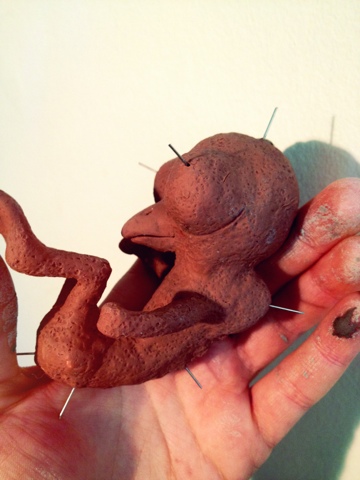
To make the texture I used the tip of a pin, slowly working over the surface. I want the surface to be rough as if feathers would grow there one day.
When I was pleased with the sculpt it is time to prepare for moulding.

To do this I use chavant clay, and sculpt a thin layer on top of the Fimo. I have made an armature to hold the foetus while I sculpt, so I can reach it from all directions. The armature is bendable which allows me to move it around as I want.
It is tricky to sculpt this small and takes considerably longer time than what you can imagine.
To make the texture I used the tip of a pin, slowly working over the surface. I want the surface to be rough as if feathers would grow there one day.
When I was pleased with the sculpt it is time to prepare for moulding.
Prenumerera på:
Inlägg (Atom)